Pages

Showing posts with label craft show display. Show all posts

Sunday, November 3, 2013

Jewelry Craft Show Displays


I don't do many shows, so the displays I use are usually home-made and inexpensive.  Since we are in the middle of show season, I thought I'd re-post my DIY earring display.  Here is the original post.

The earring cards and hangers were a great investment.  Each card has a little plastic back 'hook' so I was able to hang them on ribbon.


The hooks are adhesive and attach right to the back of the card you want to hang:


Photobomb by Marnie:


I purchased the hangers from the Homegrown Gems shop on ETSY.  The shop has a lot of great jewelry cards and tags along with accessories.

I've also found that baseball trading card stands make great earring displays.   I found these on EBAY: 


They're the perfect size to display earrings as well as my business cards:


Good luck in all of your shows!


Wednesday, September 26, 2012

Top 10 Tips For Craft Show Vendors

It’s that time of year again!  Fall arts and craft shows!  I love being both a shopper and vendor at shows.  I do a handful of shows a year and thought I’d share my top 10 list of advice for vendors.

1)  Make sure all items are tagged.  Some shoppers may feel uncomfortable having to ask for the price.  I purchase the business cards and tags I use at shows on ETSY.


2)  If you have a smart phone, use a credit card reader.  I use Square which offers a free reader when you sign up.   

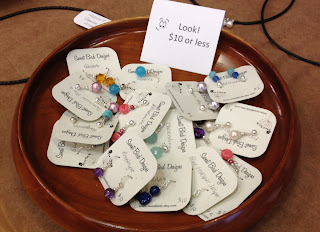
3)  Have items in a wide price range to appeal to a variety of shoppers.  I usually have a bowl of earrings that are $10 or less which is always fun and popular.  


4)  Create a display with a cohesive design that represents the 'look and feel' of your product.  I use a solid suede-like piece of fabric as my table cover.  It’s a nice shade of brown which looks good as the backdrop to my jewelry.  I stay away from prints because my items will get lost in the design.  I used to use an ivory backdrop but then realized that my items just weren’t ‘popping’.  Also try not to be too cluttered, like this picture from my first craft show:


5)  Group 'like' items together if you're selling jewelry items or something similar.  I'll display my items in groupings by color or gemstone .... that way if someone is interested in a turquoise necklace, they'll see a complimenting pair of earrings or bracelet.  


6)  Use unique items to create different display on your table.  Try to have some of your items elevated.  Think outside the box…. Mirrors, vintage luggage, cake plates, picture frames can all become unique ways to display your items.  Here are some examples of displays from a home show I did last year:


7) Make your displays!  You don't have to spend a lot of money.  Here's my post from earlier this year with DIY instructions for an earring display:  DIY Earring Display


8)  If you can, bring a helper!  It’s amazing how all at once multiple people are ready to check out and others have questions!  It will also give you a chance to browse the show and take a restroom break. 

9)  Be approachable!  Don’t stay seated behind your display. Take time to go in front of your table and tidy up your displays... and chat with customers while you're there.  You can be friendly to customers without being over-bearing or pushy.

10)  Good luck and most important, have fun!  

Sunday, April 8, 2012

DIY Craft Show Earring Display


A couple weeks ago I posted a few tips for selling at a craft show.  You'll find that post here.  I needed something to display my earrings on and didn't want to spend a lot of money.  I wanted to make sure that my display didn't distract too much from earrings themselves.  I also needed something that had some height to it.  After searching and not finding anything I liked, I decided to make my own. 

Supplies:
  • 2 framed cork boards.  Mine were 11x17 inches  (I purchased them at Joann Fabrics.  With a 50% coupon, it was less than $6 for both)
  • 2 sets of hinges
  • ribbon (mine was 1/2 inch)
  • staple gun
 (1)  Attach the 2 boards with the hinges.  Make sure you decide how you want the boards to fold before attaching the hinges.


(2)  Cut strips of ribbon and decide how far apart you want them.  I measured the space between the ribbon and taped them temporarily to the boards.


(3)  Use a staple gun to attach the ribbon to the boards. 


Here is the board lying flat. 


The nice thing is that it can be folded for travel and storage.  I kept the background as the corkboard, but you could cover it with paper or fabric before putting on the ribbon if you want a different background. 


The finished display:


And here's the final display at my show!  It's the perfect display to use with my new earring cards.


This was a quick project and something I can use again!